SKU: OT2020-D106 Numero articolo: AB081 EAN: 8455269820906

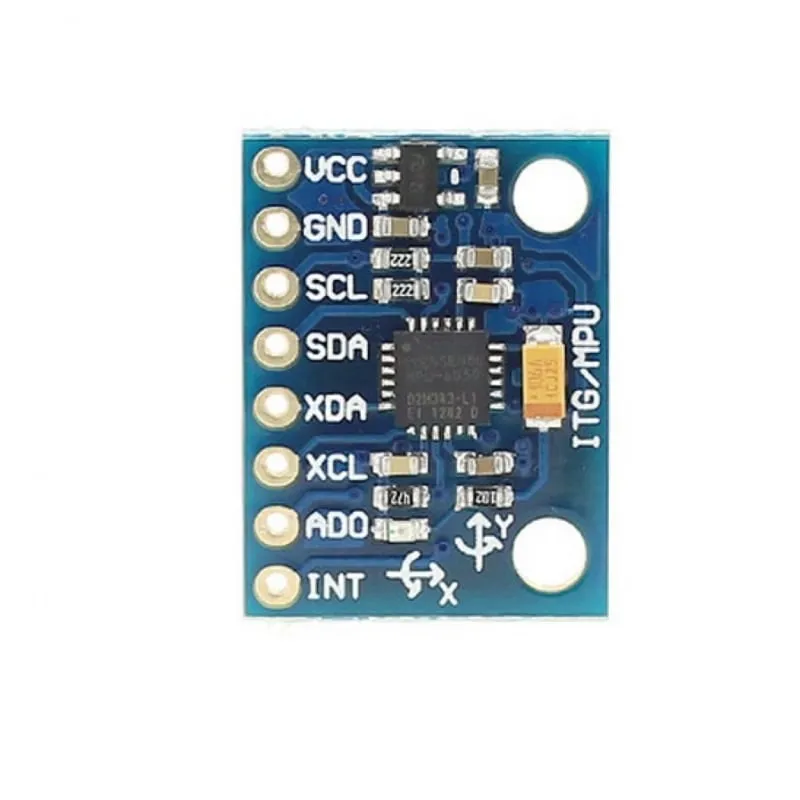
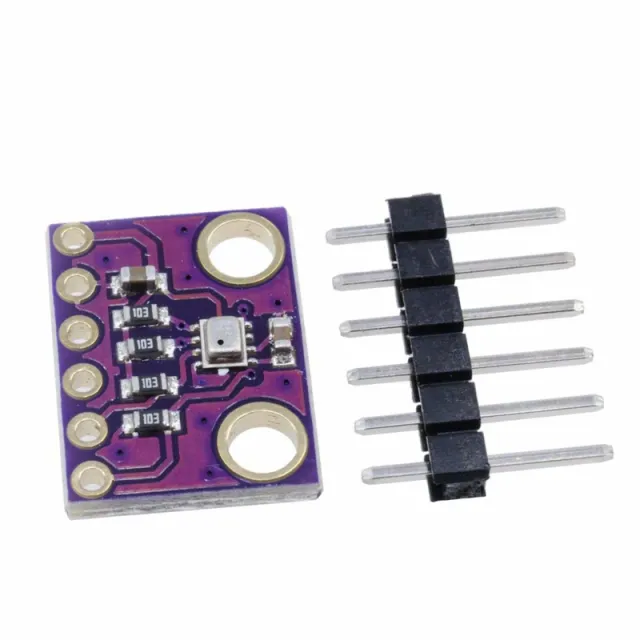
Il modulo MPU-6050 integra un sensore di accelerazione a 3 assi e un giroscopio a 3 assi. Oltre a un ingombro ridotto rispetto alle soluzioni singole, questo modulo risolve anche i problemi di differenze nei sistemi multi-componente tipici.
Il database InvenSense integrato riduce l'elaborazione complessa e offre un framework per lo sviluppo di applicazioni e API.
I2C fino a 400 kHz è disponibile per la trasmissione dei dati.
Dati tecnici
- Modulo MPU-6050 (giroscopio a tre assi + accelerazione a tre assi)
- Alimentazione: 3- 5 V (differenza di bassa tensione interna)
- Comunicazione: il protocollo di comunicazione IIC standard
- Chip con convertitore AD a 16 bit integrato, uscita dati a 16 bit
- Intervallo del giroscopio: ±250, ±500, ±1000, ±2000 °/ s (16 bit)
- Intervallo di accelerazione: ±2, ±4, ±8, ±16 g (16 bit)
- sensore di temperatura integrato
Esempi di utilizzo
- Giochi di rilevamento del movimento
- realtà aumentata
- stabilizzazione elettronica & ottica dell'immagine
Dimensioni
Lunghezza: 2,1cm
Larghezza: 1,6cm
Altezza: 0,34cm
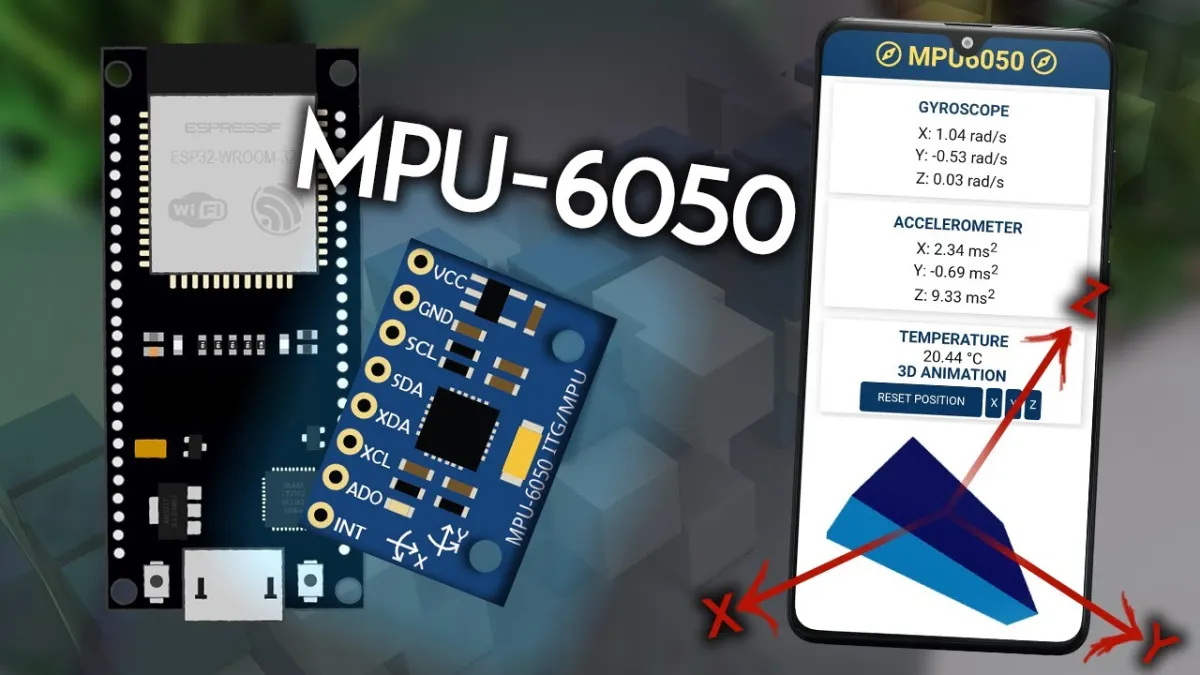
La riproduzione carica il video da YouTube.
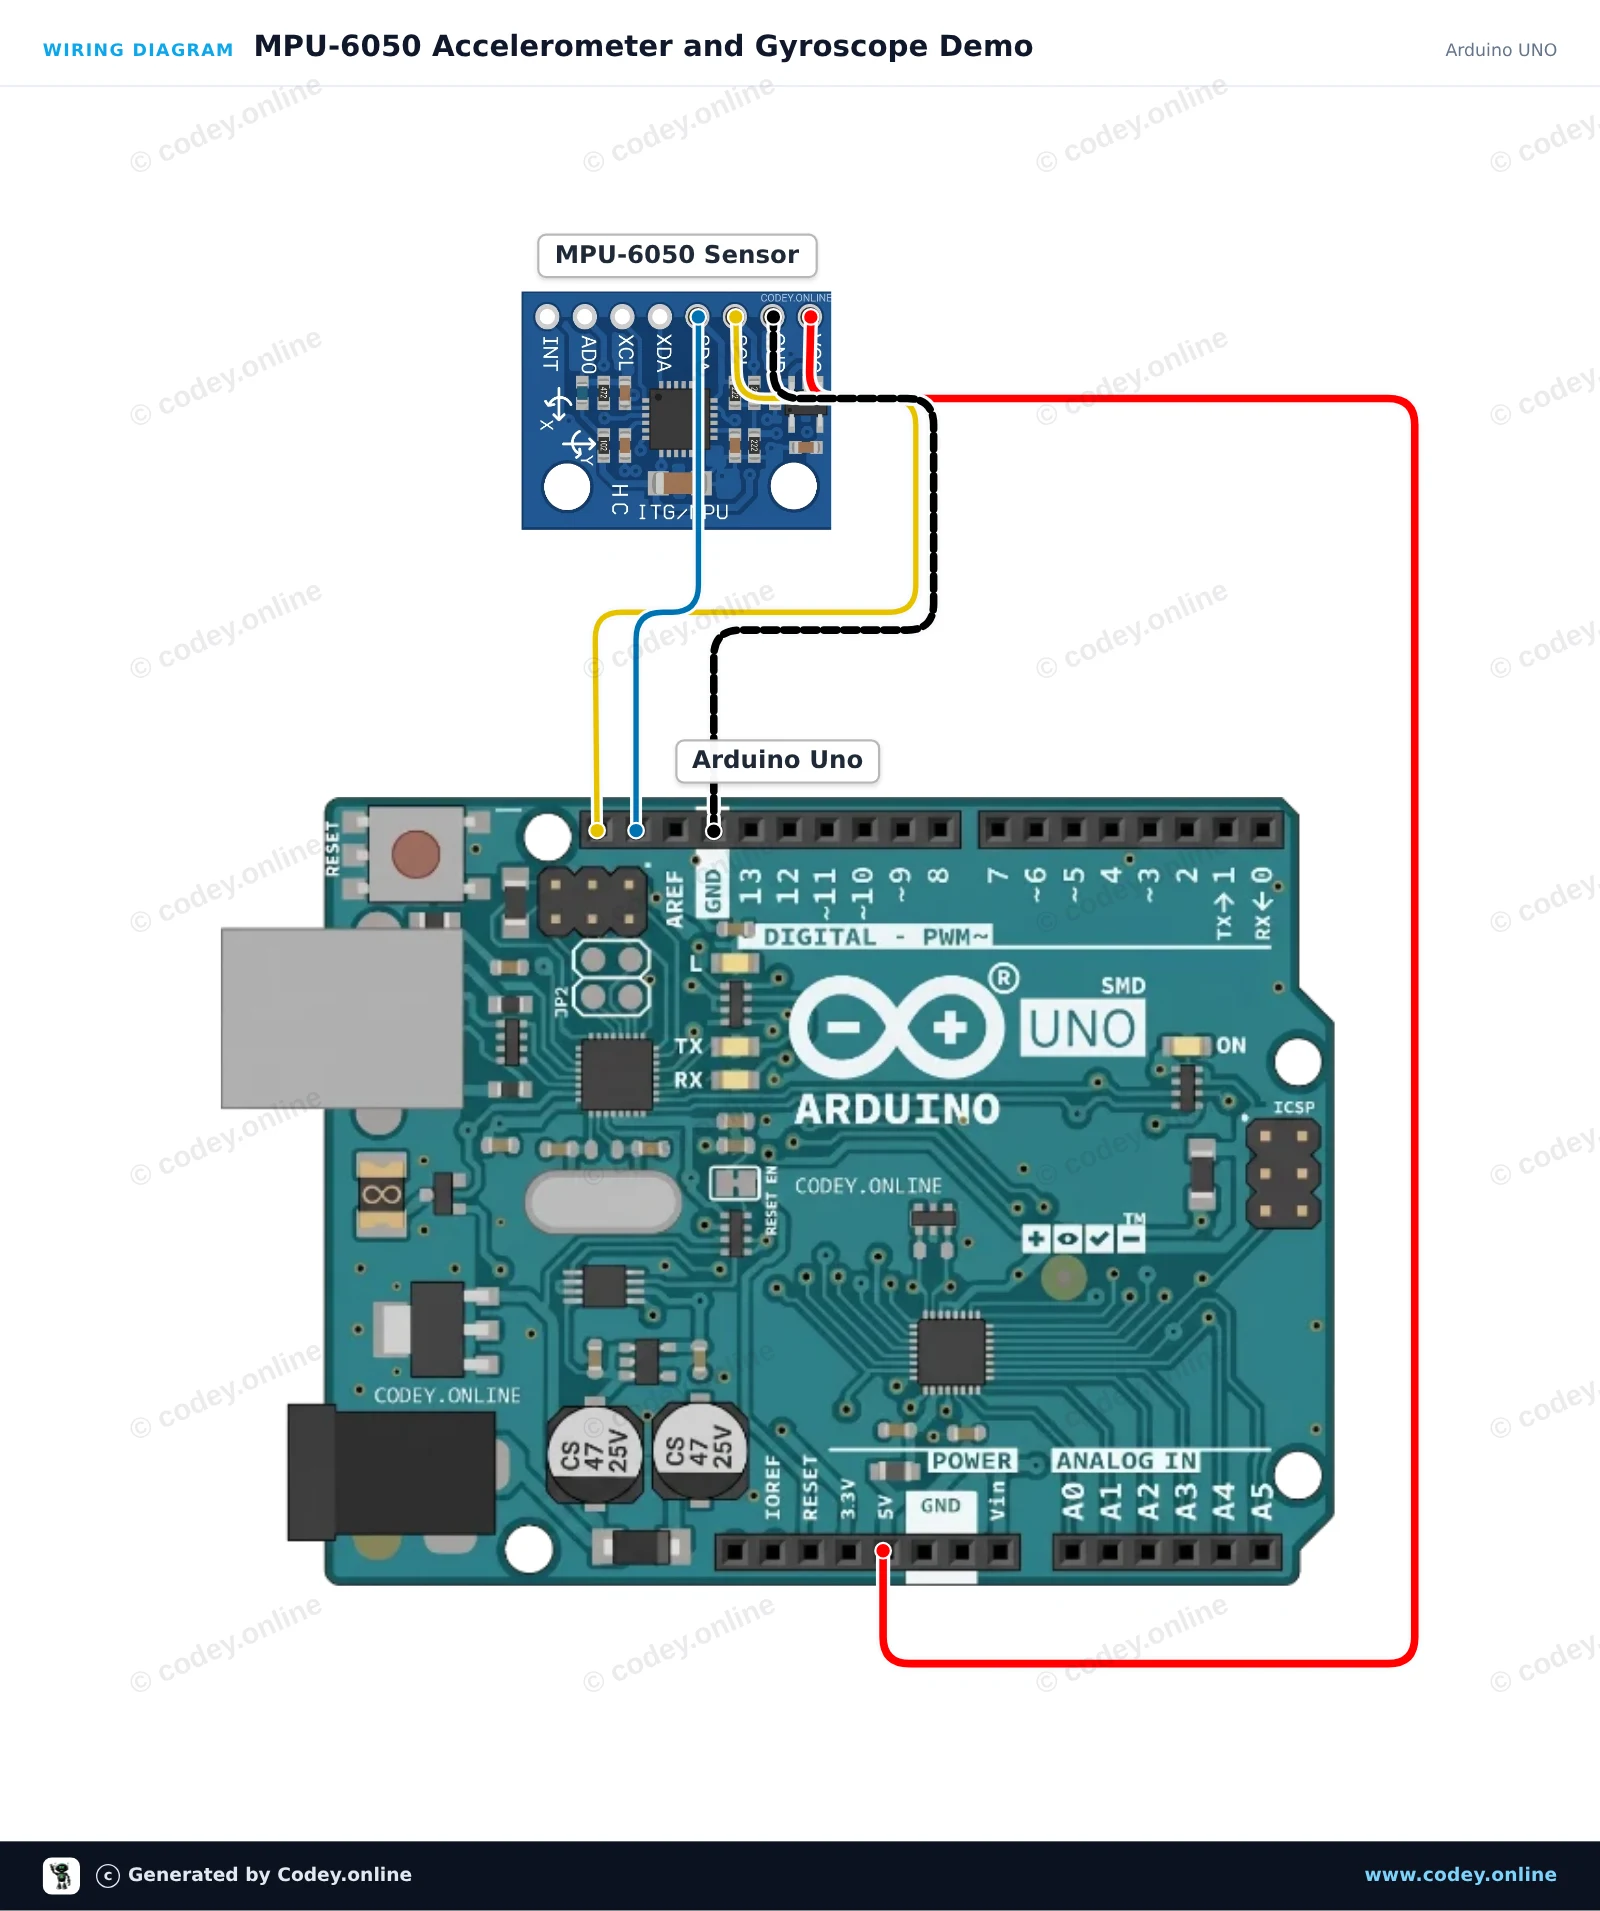
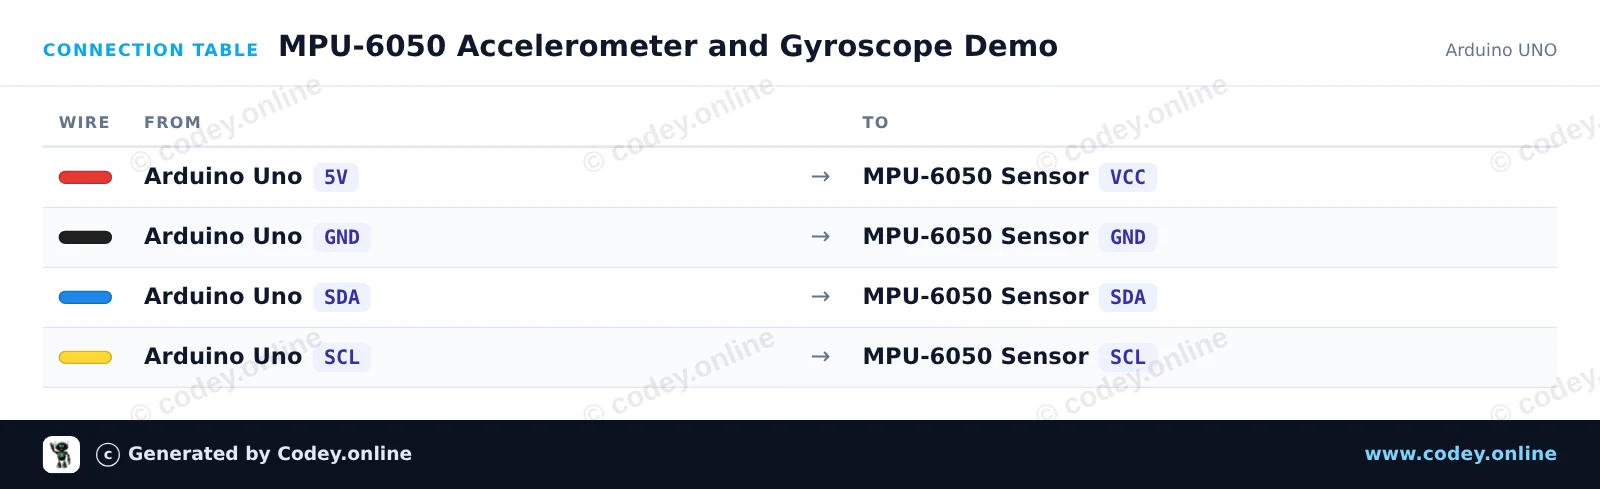
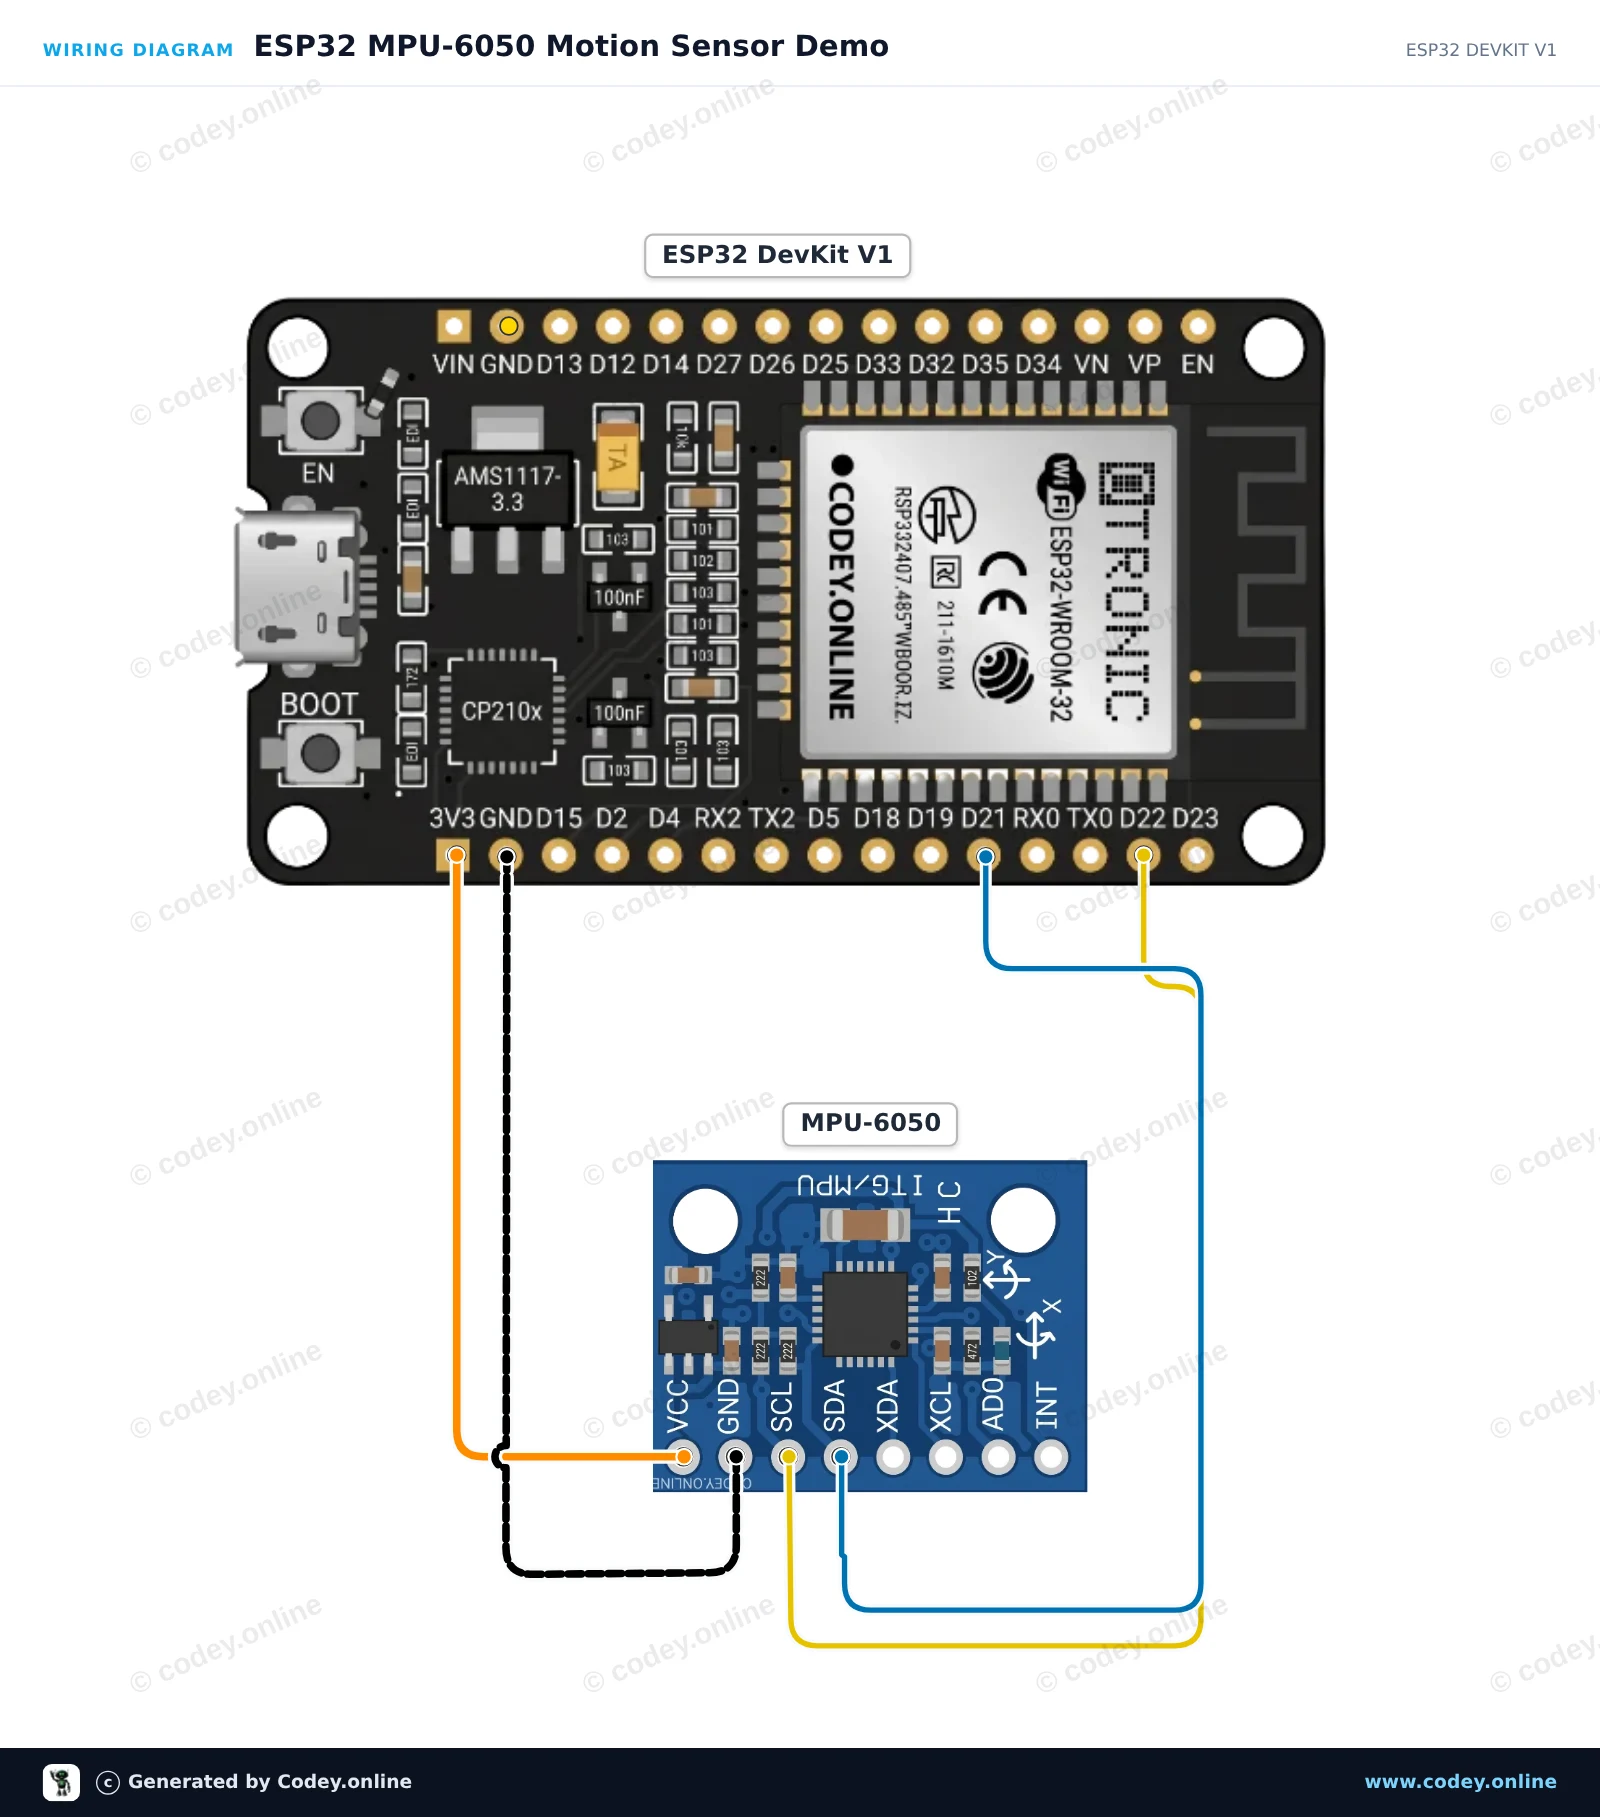
Ecco come collegare il Accelerometro e giroscopio I2C - MPU-6050 a un Arduino UNO o ESP32, con uno sketch di esempio che puoi caricare subito.
Questo progetto legge i dati di accelerazione e velocità angolare dal sensore di motion tracking a 6 assi MPU-6050 tramite I2C. Collega il sensore all’Arduino Uno, carica il codice e apri il Serial Monitor a 115200 baud per visualizzare le letture di movimento in tempo reale mentre inclini e ruoti il modulo.
/*
 * ==================================================================
 *  Generated by Codey.online  —  https://www.codey.online
 * ==================================================================
 *  Project   : MPU-6050 Accelerometer and Gyroscope Demo
 *  Board     : Arduino UNO (arduino:avr:uno)
 *  Parts     : Accelerometer and Gyroscope I2C MPU-6050
 *  Libraries : Adafruit MPU6050 2.2.9, Adafruit Unified Sensor 1.1.15, Adafruit BusIO 1.17.4
 *
 *  Codey Online is an AI-powered browser IDE for Arduino and ESP32.
 *  Describe your project and Codey writes the code, draws the wiring
 *  diagram and uploads it to your board, straight from the browser.
 *  This code is free to use, modify and share, without warranty.
 * ==================================================================
 */

#include <Wire.h>
#include <Adafruit_MPU6050.h>
#include <Adafruit_Sensor.h>

Adafruit_MPU6050 mpu;

void setup() {
  Serial.begin(115200);
  while (!Serial) {
    delay(10);
  }

  Serial.println(F("Initializing MPU-6050..."));
  if (!mpu.begin()) {
    Serial.println(F("Failed to find MPU-6050 chip. Check connections!"));
    while (1) {
      delay(10);
    }
  }
  Serial.println(F("MPU-6050 initialized successfully!"));

  // Configure sensor ranges and filter bandwidth
  mpu.setAccelerometerRange(MPU6050_RANGE_8_G);
  mpu.setGyroRange(MPU6050_RANGE_500_DEG);
  mpu.setFilterBandwidth(MPU6050_BAND_21_HZ);
}

void loop() {
  sensors_event_t a, g, temp;
  mpu.getEvent(&a, &g, &temp);

  // Print acceleration in m/s^2
  Serial.print(F("Accel (m/s^2) X: "));
  Serial.print(a.acceleration.x, 2);
  Serial.print(F(", Y: "));
  Serial.print(a.acceleration.y, 2);
  Serial.print(F(", Z: "));
  Serial.print(a.acceleration.z, 2);

  // Print rotation rate in rad/s
  Serial.print(F(" | Gyro (rad/s) X: "));
  Serial.print(g.gyro.x, 2);
  Serial.print(F(", Y: "));
  Serial.print(g.gyro.y, 2);
  Serial.print(F(", Z: "));
  Serial.print(g.gyro.z, 2);

  // Print onboard temperature
  Serial.print(F(" | Temp: "));
  Serial.print(temp.temperature, 1);
  Serial.println(F(" C"));

  delay(500);
}Librerie necessarie: Adafruit MPU6050 2.2.9, Adafruit Unified Sensor 1.1.15, Adafruit BusIO 1.17.4
Wiring diagram and example code generated by Codey.online — https://www.codey.online
Questo progetto legge l’accelerazione su 3 assi, la velocità di rotazione e la temperatura dal sensore MPU-6050 tramite I2C. L’ESP32 legge i dati del sensore a 10 Hz e stampa valori formattati nel Serial Monitor a 115200 baud. Apri il Serial Plotter per visualizzare grafici in tempo reale dei movimenti del sensore.
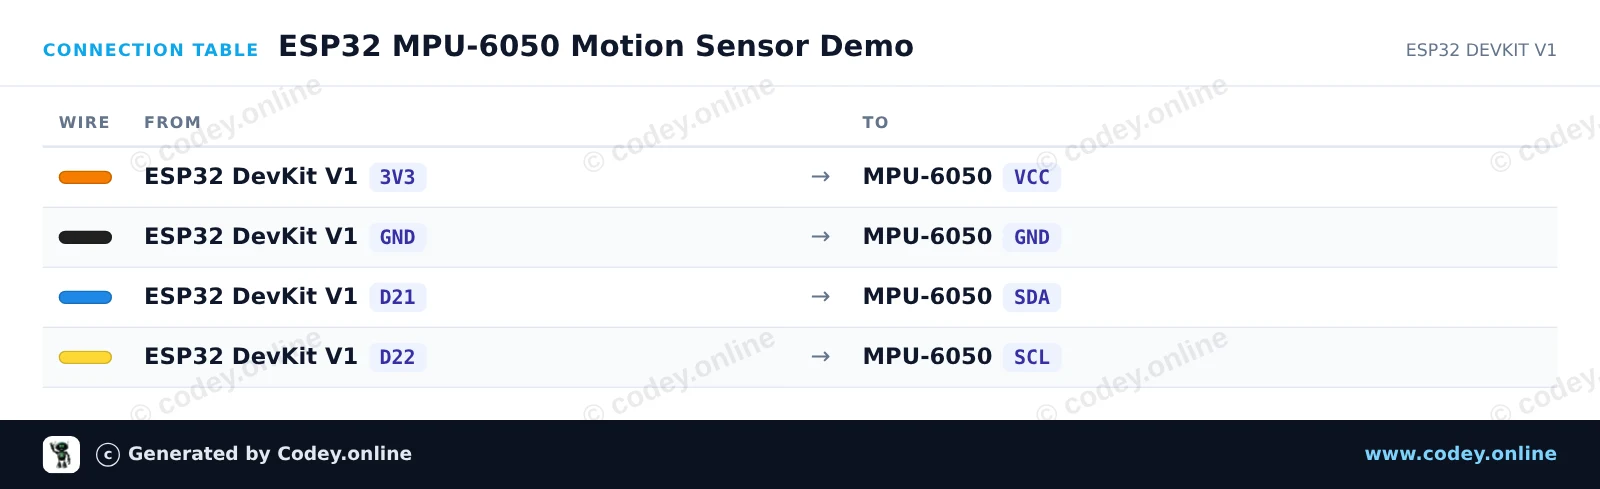
/*
 * ==================================================================
 *  Generated by Codey.online  —  https://www.codey.online
 * ==================================================================
 *  Project   : ESP32 MPU-6050 Motion Sensor Demo
 *  Board     : ESP32 DEVKIT V1 (esp32:esp32:esp32doit-devkit-v1)
 *  Parts     : Accelerometer and Gyroscope I2C MPU-6050
 *  Libraries : Adafruit MPU6050 2.2.9, Adafruit Unified Sensor 1.1.15
 *
 *  Codey Online is an AI-powered browser IDE for Arduino and ESP32.
 *  Describe your project and Codey writes the code, draws the wiring
 *  diagram and uploads it to your board, straight from the browser.
 *  This code is free to use, modify and share, without warranty.
 * ==================================================================
 */

#include <Adafruit_MPU6050.h>
#include <Adafruit_Sensor.h>
#include <Wire.h>

Adafruit_MPU6050 mpu;

void setup() {
  Serial.begin(115200);
  while (!Serial) delay(10);

  Serial.println("Initializing MPU-6050...");

  // Initialize I2C on ESP32 default pins: SDA (GPIO 21), SCL (GPIO 22)
  Wire.begin(21, 22);

  if (!mpu.begin(0x68, &Wire)) {
    Serial.println("Failed to find MPU-6050 chip!");
    while (1) {
      delay(10);
    }
  }

  Serial.println("MPU-6050 Found!");

  // Configure sensor ranges
  mpu.setAccelerometerRange(MPU6050_RANGE_8_G);
  mpu.setGyroRange(MPU6050_RANGE_500_DEG);
  mpu.setFilterBandwidth(MPU6050_BAND_21_HZ);

  delay(100);
}

void loop() {
  sensors_event_t a, g, temp;
  mpu.getEvent(&a, &g, &temp);

  Serial.print("Accel X: ");
  Serial.print(a.acceleration.x, 2);
  Serial.print(" m/s^2, Y: ");
  Serial.print(a.acceleration.y, 2);
  Serial.print(" m/s^2, Z: ");
  Serial.print(a.acceleration.z, 2);
  Serial.println(" m/s^2");

  Serial.print("Gyro X: ");
  Serial.print(g.gyro.x, 2);
  Serial.print(" rad/s, Y: ");
  Serial.print(g.gyro.y, 2);
  Serial.print(" rad/s, Z: ");
  Serial.print(g.gyro.z, 2);
  Serial.println(" rad/s");

  Serial.print("Temperature: ");
  Serial.print(temp.temperature, 1);
  Serial.println(" degC");
  Serial.println("------------------------------------");

  delay(500);
}Librerie necessarie: Adafruit MPU6050 2.2.9, Adafruit Unified Sensor 1.1.15
Wiring diagram and example code generated by Codey.online — https://www.codey.online






 English
  Nederlands
  Frans
Frans  Deutsch
  Español
  Suomi
Suomi  Polski
  Dansk
Dansk  Ελληνικά
  Български
  Čeština
  Hrvatski
  Aileen